Spring Core之IOC与DI
Spring Framework概览
Spring 是一个开源框架,是为了解决企业应用程序开发复杂性而创建的。框架的主要优势之一就是其分层架构,分层架构允许您选择使用哪一个组件,同时为 J2EE 应用程序开发提供集成的框架。
Spring是个分层架构的框架,主要是由七大模块组成,分别是Core、AOP、ORM、DAO、Web、Context、Web MVC,它们的整体结构如下图所示。
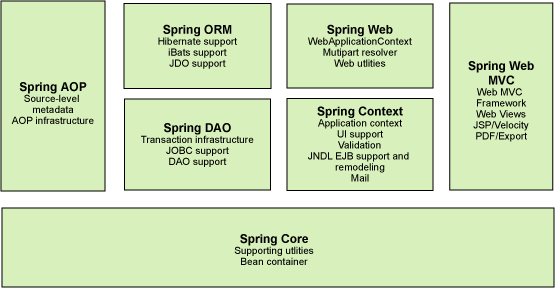
组成 Spring 框架的每个模块(或组件)都可以单独存在,或者与其他一个或多个模块联合实现。每个模块的功能如下:
- 核心容器:核心容器提供 Spring 框架的基本功能。核心容器的主要组件是
BeanFactory,它是工厂模式的实现。BeanFactory使用控制反转 (IOC) 模式将应用程序的配置和依赖性规范与实际的应用程序代码分开。 - Spring Context:Spring Context是一个配置文件,向 Spring 框架提供上下文信息。Spring Context包括企业服务,例如 JNDI、EJB、电子邮件、国际化、校验和调度功能。
- Spring AOP:通过配置管理特性,Spring AOP 模块直接将面向方面的编程功能集成到了 Spring 框架中。所以,可以很容易地使 Spring 框架管理的任何对象支持 AOP。Spring AOP 模块为基于 Spring 的应用程序中的对象提供了事务管理服务。通过使用 Spring AOP,不用依赖 EJB 组件,就可以将声明性事务管理集成到应用程序中。
- Spring DAO:JDBC DAO 抽象层提供了有意义的异常层次结构,可用该结构来管理异常处理和不同数据库供应商抛出的错误消息。异常层次结构简化了错误处理,并且极大地降低了需要编写的异常代码数量(例如打开和关闭连接)。Spring DAO 的面向 JDBC 的异常遵从通用的 DAO 异常层次结构。
- Spring ORM:Spring 框架插入了若干个 ORM 框架,从而提供了 ORM 的对象关系工具,其中包括 JDO、Hibernate 和 iBatis SQL Map。所有这些都遵从 Spring 的通用事务和 DAO 异常层次结构。
- Spring Web 模块:Web 上下文模块建立在应用程序上下文模块之上,为基于 Web 的应用程序提供了上下文。所以,Spring 框架支持与 Jakarta Struts 的集成。Web 模块还简化了处理多部分请求以及将请求参数绑定到域对象的工作。
- Spring MVC 框架:MVC 框架是一个全功能的构建 Web 应用程序的 MVC 实现。通过策略接口,MVC 框架变成为高度可配置的,MVC 容纳了大量视图技术,其中包括 JSP、Velocity、Tiles、iText 和 POI。
Spring 框架的功能可以用在任何 J2EE 服务器中,大多数功能也适用于不受管理的环境。Spring 的核心要点是:支持不绑定到特定 J2EE 服务的可重用业务和数据访问对象。毫无疑问,这样的对象可以在不同 J2EE 环境 (Web 或 EJB)、独立应用程序、测试环境之间重用。
Spring的安装配置
- 首先,需要将spring的jar包导入项目的资源文件中,如果没有是常规的项目需要自己去maven仓库下载需要用到的spring框架的jar包(JaveSE项目一般会用到spring-context、spring-core、spring-beans、spring-aop、 spring-expression、spring commons logging bridge)。如果项目是maven项目,那么在项目的pom.xml文件添加spring的依赖即可
<dependencies>
    <!-- Spring IOC最小依赖是beans、context,我们引入context依赖,maven会自动将beans依赖一并引入 -->
    <dependency>
        <groupId>org.springframework</groupId>
        <artifactId>spring-context</artifactId>
        <version>5.1.5.RELEASE</version>
    </dependency>
</dependencies>
- 其次,需要新建一个spring的xml配置文件,在IDEA中一般这个文件放在resources文件夹下。配置文件的头部约束可以参考下面的配置
<?xml version="1.0" encoding="UTF-8"?>
<beans xmlns="http://www.springframework.org/schema/beans"
       xmlns:xsi="http://www.w3.org/2001/XMLSchema-instance"
       xmlns:context="http://www.springframework.org/schema/context"
       xsi:schemaLocation="http://www.springframework.org/schema/beans
        http://www.springframework.org/schema/beans/spring-beans.xsd
        http://www.springframework.org/schema/context
        http://www.springframework.org/schema/context/spring-context.xsd">
	<!-- 开启注解支持(如果不需要使用注解就不用指定这个了)-->
    <context:annotation-config/>
    <!-- 开启注解支持,并指定注解扫描包路径(使用这个,上面那一条就可省略了)-->
    <context:component-scan base-package="com.spring.demo" />

</beans>
Spring的控制反转(IOC)
IOC的概念
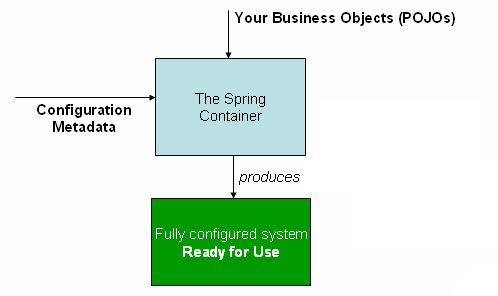
SpringIOC(Inversion of Control)是一个容器,也就是我们通常所说的控制反转。 IOC容器将我们的javabean和一些用于描述这些bean应该如何初始化、组装的配置信息进行整合。提供给我们开发人员一个配置、组装完成的上下文给我们使用,我们可以方便的通过IOC容器将繁杂的对象创建、管理工作托管给IOC容器。所以称之为控制反转。(由原来的开发人员自己控制对象的创建、组装改为交由Spring IOC容器负责)
配置元数据
配置元数据用于告诉SpringIOC容器,你的javabean应该怎么初始化、装配,以及它的生命周期(单例、原型等)。
配置元数据有xml和annotation两种方式。
XML配置方式
- 优点:对代码没有任何侵入性, 改了配置不需要重新编译、打包
- 缺点:配置相比注解的方式要繁琐很多,工程量比较大
- 示例
<?xml version="1.0" encoding="UTF-8"?>
<beans xmlns="http://www.springframework.org/schema/beans"
    	xmlns:xsi="http://www.w3.org/2001/XMLSchema-instance"
   		xsi:schemaLocation="http://www.springframework.org/schema/beans
        http://www.springframework.org/schema/beans/spring-beans.xsd">

    <bean id="..." class="...">
        <!-- 这里可以配置要为bean对象注入的属性或构造参数等 -->
    </bean>
    <bean id="..." class="...">
        <!-- 这里可以配置要为bean对象注入的属性或构造参数等 -->
    </bean>
    <!-- 下面可以跟着继续配置bean,有多少个配置多少个 -->
</beans>
- id属性代表该bean在Spring容器中的唯一标识
- class属性指定该bean的类型,需要指定类的全名
Annotation配置方式
这里只给出部分注解,常用的注解详见附录
注解配置的优缺点:
- 优点:配置简单。由于Java类中已经包含了上下文信息,所有在Java类上直接加注解可以省略很多属性。
- 缺点:对代码有侵入性,如果改了是基于注解的配置信息改变了,需要重新编译、打包
开启注解支持
刚开始的配置文件,我直接就说了一种在xml文件中开启注解支持的方式,这里再介绍一种注解开启注解配置支持的方式。
@Configuration// 相当于<beans>
@ComponentScan("com.spring.demo")// 注解的扫描包路径
public class AppConfig  {

  	@Bean// 相当于<bean>
    public TestDao testDao() {
       return new TestDao();
    }
  	// 其他bean配置....

    public static void main(String[] args) {
      // 如果在非web工程中使用这种方式开启注解支持,需要使用下面的方式初始化ioc容器,否则@ComponentScan注解会被忽略
      ConfigurableApplicationContext config = new AnnotationConfigApplicationContext(AppConfig.class);
    }
}
注解扫描过滤(一般用不到)
Spring默认会扫描componentScan配置的basePackages包下所有带有扩展自@Component注解(如:@Repository、@Service、@Controller)的类。我们可以通过给componentscan添加filter来进一步控制扫描哪些注解、忽略哪些注解
如:下面展示了如何忽略@Repository注解,而用含Stub关键字前缀的自定义Repository注解代替
@Configuration
@ComponentScan(basePackages = "org.example",
        includeFilters = @Filter(type = FilterType.REGEX, pattern = ".*Stub.*Repository"),
        excludeFilters = @Filter(Repository.class))
public class AppConfig {
    ...
}
对应的xml配置方法
<beans>
    <context:component-scan base-package="org.example">
        <context:include-filter type="regex"
                expression=".*Stub.*Repository"/>
        <context:exclude-filter type="annotation"
                expression="org.springframework.stereotype.Repository"/>
    </context:component-scan>
</beans>
注解和XML文件混合配置
由于xml文件配置和注解配置都各有优劣,因此我们可以根据使用的场景选择性使用配置方式。甚至可以选择同时使用它们两种方式进行配合使用,都是可以的。比如数据源的配置, 就不适合通过注解来配置。否则数据源配置一发生变化就得改代码。
IOC容器的使用
BeanFactory
在Spring中,构成应用程序主干并由Spring IoC容器管理的对象称为bean。bean是一个由Spring IoC容器实例化,组装和管理的对象。
Spring提供了一个顶层的BeanFactory接口来管理Spring上下文中的所有类。同时还为我们提供了ApplicationContext子接口,提供了更为强大的功能。
ApplicationContext
ApplicationContext是BeanFactory的一个子接口,它代表了SpringIOC容器,通过它我们可以实现对SpringIOC容器的所有操作:实例化、配置、组装bean。
通常我们在开发中直接用到的是ApplicatoinContext接口和它的各种实现类。
ClassPathXmlApplicationContext
用于加载类路径下的spring配置文件,通常用于控制台程序
ApplicationContext ctx = new ClassPathXmlApplicationContext("applicationContext.xml");
StudentService ss = ctx.getBean(StudentService.class);
System.out.println(ss);
AnnotationConfigApplicationContext
用于初始化通过注解方式配置的ioc容器
@Configuration
public class AppConfig {

    @Bean
    public MyService myService() {
        return new MyServiceImpl();
    }

  	public static void main(String[] args) {
      ApplicationContext ctx = new AnnotationConfigApplicationContext(AppConfig.class);
      MyService myService = ctx.getBean(MyService.class);
      myService.doStuff();
		}
}
FileSystemXmlApplicationContext
用于加载本地目录中的spring文件文件
ApplicationContext ctx = new FileSystemXmlApplicationContext("" +
                "F:/applicationContext.xml");
StudentService ss = ctx.getBean(StudentService.class);
System.out.println(ss);
XmlWebApplicationContext
XmlWebApplicatoinContext用于在Web工程中初始化SpringIOC容器,不过我们一般不会手动通过它来初始化IOC容器,Spring针对Web工程专门给我们提供了一个监听器来完成IOC容器的初始化工作,用法如下:
在项目的web.xml中配置
<!-- 通过Spring提供的ContextLoaderListener监听器完成Spring容器初始化 -->
<context-param>
    <param-name>contextConfigLocation</param-name>
    <param-value>/WEB-INF/daoContext.xml /WEB-INF/applicationContext.xml</param-value>
</context-param>

<listener>
    <listener-class>org.springframework.web.context.ContextLoaderListener</listener-class>
</listener>
在ContextLoaderListener中Spring会优先判断用户是否在web.xml中配置了名为contextClass的<context-param>参数,如果配置了优先使用用户制定的ApplicationContext实现类来初始化IOC,反之则使用默认的ApplicationContext实现类:org.springframework.web.context.support.XmlWebApplicationContext来完成IOC容器的初始化工作。
注:XmlWebApplicationContext默认加载路径是/WEB-INF/applicationContext.xml,如果我们的配置spring文件是放在这里的,并且只有这一个,我们可以不配置contextConfigLocation参数。
Spring Bean
Spring容器通过在xml中通过<bean>标签来添加一个JavaBean到IOC容器中(注解中通过@Bean、@Component、@Service等注解来添加一个Bean到容器中)
bean的属性
Spring给我们提供了下面这些属性来管理bean的实例化、生命周期(初始化、销毁)、参数&属性注入、作用域、装配方式等。
| 属性 | 含义 |
|---|---|
| class | 全路径类名,表示该bean的类型 |
| name | 在ioc容器中的名称,在获取bean的时候可以通过名称获取 |
| scope | 见下表scope |
| constructor-arg (属性或子标签) | 注入构造方法的参数 |
| property (属性或子标签) | 注入属性 |
| autowire | 自动装配模式 |
| lazy-init | 是否启用懒加载: true/false |
| init-method | 允许我们指定一个自定义的初始化方法 |
| destroy-method | 允许我们指定一个自定义的销毁方法 |
Bean的作用域
| Scope | Description |
|---|---|
| singleton | 单例。在整个ioc容器中只有一个此类型的示例。(默认值) |
| prototype | 原型。每次使用都用创建一个新的对象。 |
| request | 对象的实例仅在一个request请求周期内有效,仅限在web环境中使用。 |
| session | 对象的实例仅在一个session会话周期内有效,仅限在web环境中使用。 |
| application | 对象的实例在整个application生命周期内有效,仅限在web环境中使用。 |
| websocket | 对象的实例仅在一个websocket生命周期内有效,仅限在web环境中使用。 |
下面以单例和原型为例介绍了一下bean作用域的作用
单例:singleton(默认)
<bean id="md" class="com.spring.dao.daoimpl.MessageDaoImpl" scorp="singleton"/>
无论调用多少次getBean()获取到的都是同一个对象。
原型:propotype
<bean id="md" class="com.spring.dao.daoimpl.MessageDaoImpl" scorp="prototype"/>
每调用一次getBean()获取到的都是新的对象。
命名beans
使用id属性命名bean
id属性的值只能指定一个,不建议含有特殊字符(虽然自spring3.1开始id属性的值可以包含任意字符)。
使用name属性命名bean
使用name属性可以给一个bean指定多个名称,多个值之间可以用","或";"或空格分开
注:无论是id属性还是bean属性都要保证整个IOC容器内唯一,并且id属性的值和name属性的值也不能重复
我们可以同时指定id和name属性。 也可以都不指定,如果都不指定,IOC容器会为该bean生成一个唯一的名称。
实例化beans
通过构造方法实例化
这种方式是最常用的方式,适合绝大多数的javabean,因为我们的java类无需继承任何父类或实现任何接口。但是我们通常需要提供一个无参的或者有参的构造方法。
<!-- 无参构造 -->
<bean id="exampleBean" class="examples.ExampleBean"/>
<!-- 有参构造方法 -->
<bean name="anotherExample" class="examples.ExampleBeanTwo">
	<constructor-arg name="thingTwo" value="参数为非引用类型"/>
    <!-- 参数为引用类型 -->
    <constructor-arg name="thingThree" ref="exampleBean"/>
</bean>
通过静态工厂方法实例化
<bean id="clientService" class="examples.ClientService" factory-method="createInstance">
	<!-- 如果工厂方法需要参数,通过此标签传参 -->
  <constructor-arg name="cname" value="TestService" />
</bean>
public class ClientService {
    private static ClientService clientService = null;
  	private String cname;
    private ClientService() {}
  	private ClientService(String cname) {this.cname = cname;}

    public synchronized static ClientService createInstance(String cname) {
        if(clientService == null) {
           clientService = new ClientService(cname);
        }
      return clientService;
    }

  	public synchronized static ClientService createInstance() {
        if(clientService == null) {
           clientService = new ClientService();
        }
      return clientService;
    }
}
这种方式适合需要让Spring管理自己实现的单例类,用的很少。因为通过Spring IOC容器我们只需配置一下scope="singleton"就可以实现单例了。
通过对象工厂方法实例化
这种方式用的也不多,只有特定场合才会用到。首先给出示例的Java类
public class DefaultServiceLocator {

    private static ClientService clientService = new ClientServiceImpl();

  	private static AccountService accountService = new AccountServiceImpl();

    public ClientService createClientServiceInstance() {
        return clientService;
    }

  	public AccountService createAccountServiceInstance() {
        return accountService;
    }
}
该Java类对应的xml配置如下
<bean id="serviceLocator" class="examples.DefaultServiceLocator">
    <!-- 注入这个bean所有需要的依赖项 -->
</bean>

<!-- 这个bean需要通过factory bean创建实例 -->
<bean id="clientService"
    factory-bean="serviceLocator"
    factory-method="createClientServiceInstance"/>

<!-- 这个bean需要通过factory bean创建实例 -->
<bean id="accountService"
    factory-bean="serviceLocator"
      factory-method="createAccountServiceInstance">

  	<!-- 如果工厂方法需要参数,通过此标签传参 -->
  	<!-- <constructor-arg name="cname" value="TestService" /> -->

</bean>
Bean的生命周期
给出一个bean的初始化方法和销毁的方法
public class MessageDaoImple implements MessageDao{
    public void init(){
		System.out.println("init 被调用");
	}

    public void destroy(){
        System.out.println("destroy 被调用");
    }
}
通过xml配置文件配置bean
<bean id="md" class="com.spring.dao.daoimpl.MessageDaoImpl" init-method="init"
          destroy-method="destroy"/>
bean的懒加载
ioc中的bean默认在ioc容器启动时就都初始化了(加载配置文件时,而不是调用getBean()时),我们可以通过给bean添加一个lazy-init="true"属性延迟到调用getBean()时初始化bean
<!-- 正常懒加载 -->
<bean id="lazyBean" class="com.spring.bean.LazyInit" init-method="init" lazy-init="true"/>
<!--  如果将懒加载的bean注入到非懒加载的bean中,那么懒加载的bean也会失去懒加载的特性  -->
<bean id="md" class="com.spring.dao.daoimpl.MessageDaoImpl" init-method="init"
          destroy-method="destroy" lazy-init="true"/>
<bean id="app2" class="com.lanou3g.spring.App">
	<property name="messageDao" ref="md"/>
</bean>
Spring依赖注入——DI
Spring DI(Spring Dependency Injection),可以自动帮我们解决类与类之间的各种依赖问题。通常公司中的项目都包含很多的类,而这些类与类之间都有各种依赖关系,比如:组合、聚合、依赖等。通过Spring的DI功能,结合IOC容器, 我们可以把这些复杂的关系交由Spring来管理, 我们在使用时,Spring会自动帮我们把依赖的对象注入进来,大大降低开发难度。
Spring中的依赖注入主要包含两种:通过构造方法中的注入和通过Setter方法注入
构造参数的注入
package x.y;

public class ThingOne {
		private int age;
  	private String sname;
  	private int gender;
  	private ThingTwo thingTwo;
    public ThingOne(int age, ThingTwo thingTwo, String sname, int gender) {
        this.age = age;
				this.thingTwo = thingTwo;
      	this.sname = sname;
      	this.gender = gender;
  	    // ...
    }
}

// 为了方便这个类就也写在这里了,读者记得新建一个类
public class ThingTwo {
  // ...
}
通过xml配置为Bean对象中的属性注入值,示例如下
<beans>
    <bean id="beanOne" class="x.y.ThingOne">
        <!-- 通过此标签注入构造方法中的参数 -->
      	<constructor-arg  name="age" value="18" />
      	<constructor-arg  type="java.lang.String" value="张三" />
      	<constructor-arg ref="beanTwo"/>
    </bean>

    <bean id="beanTwo" class="x.y.ThingTwo"/>
</beans>
constructor-arg标签属性
| 属性名 | 取值 | 含义 |
|---|---|---|
| name | 字符串 | 构造参数的名称 |
| value | 数值、字符串 | 构造参数的属性值,只适用于简单类型 |
| type | 类的全名 | 构造参数的类型,如果是简单类型,需要指定对应的封装类型 如果构造参数中有多个命中的类型,按照配置的先后顺序注入(可以通过配合index属性改变默认顺序) |
| index | 数值 | 构造参数的位置,从0开始 |
| ref | 其他在Spring容器中配置的bean的name或者id | 将容器中的其他bean作为构造参数注入 |
通过C命名空间注入构造参数
使用C命名空间注入需要在xml文件的头部添加声明xmlns:c="http://www.springframework.org/schema/c"
<beans xmlns="http://www.springframework.org/schema/beans"
    xmlns:xsi="http://www.w3.org/2001/XMLSchema-instance"
    xmlns:c="http://www.springframework.org/schema/c"
    xsi:schemaLocation="http://www.springframework.org/schema/beans
        https://www.springframework.org/schema/beans/spring-beans.xsd">

    <bean id="beanTwo" class="x.y.ThingTwo"/>
    <bean id="beanThree" class="x.y.ThingThree"/>

    <!-- 传统方式注入构造参数
    <bean id="beanOne" class="x.y.ThingOne">
        <constructor-arg name="thingTwo" ref="beanTwo"/>
        <constructor-arg name="thingThree" ref="beanThree"/>
        <constructor-arg name="email" value="something@somewhere.com"/>
    </bean> -->

    <!-- c命名空间方式注入构造参数 -->
    <bean id="beanOne" class="x.y.ThingOne" c:thingTwo-ref="beanTwo"
        c:thingThree-ref="beanThree" c:email="something@somewhere.com"/>
</beans>
Setter方式注入
package com.demo;
public class Driver {
    private Car car;
  	private String dname;
    public void setCar(Car car) {
        this.car = car;
    }
  	public void setDname(String dname) {
      	this.dname = dname;
    }
}
// 还是为了方便,哈哈哈
public class Car{}
通过xml配置文件注入如下
<bean id="driver" class="com.demo.Driver">
	<!-- 注入引入类型属性 -->
  <property name="car" ref="car" />
	<!-- 注入简单类型属性 -->
  <property name="dname" value="张三" />
</bean>
<bean id="car" class="com.demo.Car" />
通过P命名空间注入属性
和C一样需要声明xmlns:p="http://www.springframework.org/schema/p"
<beans xmlns="http://www.springframework.org/schema/beans"
    xmlns:xsi="http://www.w3.org/2001/XMLSchema-instance"
    xmlns:p="http://www.springframework.org/schema/p"
    xsi:schemaLocation="http://www.springframework.org/schema/beans
    https://www.springframework.org/schema/beans/spring-beans.xsd">

  <bean id="driver" class="com.demo.Driver" p:car-ref="car" p:dname="张三" />
  <bean id="car" class="com.demo.Car" />
</beans>
注入复杂属性
首选给出需要注入的类
// 下面这两个注解相当于在这个类中为每个属性生成了Set、Get方法
@Setter
@Getter
public class Student{
    private List<Object> hobbies;
    private Map<String,Object> gameTitle;
    private String nickName;
    private Fruit fruit;
    private LazyInit lazyInit;
}
其中Fruit是一个接口类,可以定义几个实现类用来根据需求切换它的实现类
LazyInit里有一个age的属性
@Setter
@Getter
public class LazyInit{
    private age;
}
注入集合类型属性
<bean id="student2" class="com.spring.bean.Student">
        <!-- 注入集合类型属性 -->
        <property name="hobbies">
            <list>
                <value>编程</value>
                <value type="java.lang.Integer">0099</value>
                <value>游泳</value>
                <value>唱歌</value>
                <value>氪金</value>
            </list>
        </property>
    </bean>
注入Map类型属性
<bean id="student2" class="com.spring.bean.Student">
        <!-- 注入Map类型属性 -->
        <property name="gameTitle">
            <map>
                <entry key="LOL" value="辣鸡黑铁"/>
                <entry key="王者农药" value="嘴强王者"/>
                <entry key="斗地主" value="不屈白银"/>
                <entry key="和平精英">
                    <!-- 注入空类型属性 -->
                    <null/>
                </entry>
            </map>
    </bean>
注入空类型属性
<bean id="student2" class="com.spring.bean.Student">
        <!-- 注入空类型属性 -->
        <property name="nickName">
            <null/>
        </property>
    </bean>
注入匿名内部bean类型属性
<bean id="student2" class="com.spring.bean.Student">
        <!-- 注入匿名内部bean类型属性 -->
        <property name="fruit">
            <bean class="com.spring.fruit.Banana"/>
        </property>
        <property name="lazyInit">
            <bean class="com.spring.bean.LazyInit"/>
        </property>
    </bean>
注入复合属性
<bean id="student2" class="com.spring.bean.Student">
        <!-- 注入复合属性 -->
        <property name="lazyInit.age" value="18"/>
    </bean>
引入外部的properties文件
jdbc.properties文件
jdbc.driver=com.mysql.jdbc.Driver
jdbc.url=jdbc:mysql://localhost:3306/demo?charsetEncoding=UTF-8
jdbc.user=root
jdbc.password=root
引入方式一
<bean id="jdbcConf" class="org.springframework.beans.factory.config.PropertyPlaceholderConfigurer">
	<property name="location" value="classpath:jdbc.properties"/>
</bean>-->
引入方式二
<context:property-placeholder location="classpath:jdbc.properties"/>
注入外部文件的属性
<!-- 将外部properties文件中的属性注入到bean中 -->
    <bean id="jdbcConf" class="com.lanou3g.spring.bean.JDBCConf">
        <property name="url" value="${jdbc.url}" />
        <property name="driver" value="${jdbc.driver}" />
        <property name="userName" value="${jdbc.user}" />
        <property name="password" value="${jdbc.password}" />
    </bean>
附录
常用注解
@Required
用于标注在setter方法之上,表示此属性必须要注入。如果容器初始化该bean时没有合适的值注入到该属性则直接抛出异常。
在spring5.1之后弃用,因为必须要注入的属性,我们可以通过构造参数来注入。
@Autowired
根据依赖的类型自动注入。该注解可以用于标注在 属性、setter方法、构造方法、或带参数的普通方法之上。Spring会将符合的参数自动注入到属性、或方法参数中。
如果@Autowired注入的对象是一个数组类型、集合类型或者Map类型,Spring会将上下文中所有符合类型的bean都注入进来。如果你需要注入进来的bean的顺序,可以通过让这些Bean实现Ordered接口或添加@Order注解或者是标准的@Priority注解(@Priority注解不能指定通过@Bean配置的bean的顺序)。
注:如果注入的属性是一个单值类型,但Spring上下文中有多个匹配类型的候选Bean,那将会直接报错,因为Spring不知道该用哪个注入
所有可用
@Autowired的地方,我们也可以直接使用 JSR 330’s@Inject注解,两者效果一致。
注:@Autowired、@Inject、@Value和@Resource注解都是通过BeanPostProcessor实现的注入。这意味着在我们自定义的BeanPostProcessor和BeanFactoryPostProcessor中将无法使用这些注解,只能通过xml配置的方式注入。
@Resource
根据依赖bean的名称自动注入。除了可以通过Spring特有的@Autowired注解进行依赖注入外,Spring也支持原生JSR-250中的 @Resource注解。
public class SimpleMovieLister {

    private MovieFinder movieFinder;

    @Resource(name="myMovieFinder")
    public void setMovieFinder(MovieFinder movieFinder) {
        this.movieFinder = movieFinder;
    }
}
@Resource注解的name属性不是必须的,如果不指定,那默认的名称将取决于变量名称、setter方法的名称(取决于注解在变量上还是setter方法上)
@Resource注解还有个好处,如果按名称无法找到一个匹配bean的时候,它会自动按照类型查找注入。
@Primary
当我们通过@Autowired注解来注入属性或者参数时,如果遇到上面说的单值属性有多个匹配类型候选bean,如果其中一个候选Bean上配置了@Primary注解或者在xml配置中设置了primary="true",那将不会报错,Spring会优先将带primary标记的候选bean注入(当然,如果有多个带primary标记的匹配类型还是会报错滴)。
@Qualifier
该注解可以让我们通过名称在多个候选bean中进一步限定。
public class MovieRecommender {

    @Autowired
    @Qualifier("main")
    private MovieCatalog movieCatalog;

    // ...
}
通过@Qualifier限定构造参数注入
public class MovieRecommender {

    private MovieCatalog movieCatalog;

    private CustomerPreferenceDao customerPreferenceDao;

    @Autowired
    public void prepare(@Qualifier("main") MovieCatalog movieCatalog,
            CustomerPreferenceDao customerPreferenceDao) {
        this.movieCatalog = movieCatalog;
        this.customerPreferenceDao = customerPreferenceDao;
    }

    // ...
}
给bean添加qualifier标识符
在xml中我们可以通过<qualifier>子标签来给一个bean添加标识符, 以供注入时@Qualifier使用。如果不显示指定标识符,spring会用id、name代替。
<bean class="example.SimpleMovieCatalog">
        <qualifier value="main"/>
</bean>
如果bean是通过注解的方式配置的,我们可以这样做
@Component
@Qualifier("Action")	// 给bean添加qualifier标识符
public class ActionMovieCatalog implements MovieCatalog {
    // ...
}
@PostConstruct、@PreDestroy
指定bean的生命周期方法
import org.springframework.context.annotation.Scope;
import org.springframework.stereotype.Component;
import javax.annotation.PostConstruct;
import javax.annotation.PreDestroy;

@Component("md")
public class TestLifeCycle {

    @PostConstruct
    public void init() {
        System.out.println("init 被调用");
    }

    @PreDestroy
    public void destroy() {
        System.out.println("destroy 被调用");
    }
}
@Component、@Repository、 @Service、@Controller
@Component注解是一个通用注解,代表一个组件,可以用来标识所有希望让Spring管理的bean。
@Repository、 @Service、@Controller三个注解扩展自@Component,带有具体的语义色彩,专门用于修饰dao、service、controller层的类
上面这几个注解都可以通过给定value参数来指定bean的name,如果没有给定参数。那将由Spring的
AnnotationBeanNameGenerator来自动生成(其实底层就是调用了java.beans.Introspector#decapitalize()方法来实现)
@Bean、@Configuration
@Configuration 注解的类相当于xml配置文件中的<beans>
@Bean注解允许我们通过注解的方式定义在Java代码中定义bean的配置元数据,相当于xml配置文件中的<bean >
示例:
@Configuration	// 类上面必须添加此注解,否则里面用@Bean配置无法使用自动注入其他参数(被称为"精简"bean“)
public class FactoryMethodComponent {

    private static int i;

    @Bean
    @Qualifier("public")	// 定义bean的标识符相当于xml方式给<bean>标签指定子标签<qualifier>
    public TestBean publicInstance() {
        return new TestBean("publicInstance");
    }

    // 自动注入特定bean方法参数,和普通字符串类型参数
    @Bean
    protected TestBean protectedInstance(
            @Qualifier("public") TestBean spouse,
            @Value("#{privateInstance.age}") String country) {
        TestBean tb = new TestBean("protectedInstance", 1);
        tb.setSpouse(spouse);
        tb.setCountry(country);
        return tb;
    }

  	// 指定生命周期init方法,相当于xml中给<bean>添加init-method属性
  	@Bean(initMethod = "init")
    public BeanOne beanOne() {
        return new BeanOne();
    }

  	// 指定生命周期destroy方法,相当于xml中给<bean>添加destroy-method属性
    @Bean(destroyMethod = "cleanup")
    public BeanTwo beanTwo() {
        return new BeanTwo();
    }

	  //通过name属性指定bean的名称,相当于xml中给<bean>添加name属性
  	//如果不指定name属性,默认取值为方法名
    @Bean(name="testBean")
    private TestBean privateInstance() {
        return new TestBean("privateInstance", i++);
    }

    @Bean
    @RequestScope	// 指定scope, 相当于xml配置给<bean>添加scope属性
    public TestBean requestScopedInstance() {
        return new TestBean("requestScopedInstance", 3);
    }
}
@Scope
@Scope注解可以限定通过注解配置的bean的作用域。适用于通过@Component(或其派生注解)、@Bean注解配置的bean。@Scope注解的默认值是singleton,可取得值参见《Bean的作用域》章节
@Configuration
public class MyConfiguration {

    @Bean
    @Scope("prototype")
    public Encryptor encryptor() {
        // ...
    }
}
@Qualifier
@Qualifier注解可以限定通过注解配置的bean的qualifier标识符。适用于通过@Component(或其派生注解)、@Bean注解配置的bean。 相当于xml配置的<bean>的子标签<qualifier>
@Nullable
@Nullable 可用于字段、方法参数和返回值,用于将非空语义覆盖为可空语义。通常配合@Autowired或@Inject注解使用。作用与jdk8中的java.util.Optional类似
@Import
通过注解的方式导入其他注解配置
示例:
@Import({MyConf.class})
@Configuration
public class Application {

    @Bean
    public StudentService studentService() {
      return new StudentServiceImpl();
    }

    ...
}

@Configuration
public class MyConf {

    @Bean
    public StudentDao studentDao() {
      return new StudentDaoImpl();
    }

    ...
}
@ImportResource
通过注解的方式引入xml配置
示例:
@Configuration
@ImportResource("classpath:/com/acme/properties-config.xml")
public class AppConfig {

    @Value("${jdbc.url}")
    private String url;

    @Value("${jdbc.username}")
    private String username;

    @Value("${jdbc.password}")
    private String password;

    @Bean
    public DataSource dataSource() {
        return new DriverManagerDataSource(url, username, password);
    }
}
properties-config.xml
<beans>
    <context:property-placeholder location="classpath:jdbc.properties"/>
</beans>
jdbc.properties
jdbc.url=jdbc:hsqldb:hsql://localhost/xdb
jdbc.username=sa
jdbc.password=sa
使用入口:
public static void main(String[] args) {
    ApplicationContext ctx = new AnnotationConfigApplicationContext(AppConfig.class);
    TransferService transferService = ctx.getBean(TransferService.class);
    // ...
}
@PropertySource
此注解用于加载properties文件到环境中,然后我们就可以通过env获取properties文件中定义的属性
使用示例:
@Configuration
@PropertySource("classpath:app.properties")
public class AppConfig {

    @Autowired
    Environment env;

    @Bean
    public TestBean testBean() {
        TestBean testBean = new TestBean();
        testBean.setName(env.getProperty("testbean.name"));
        return testBean;
    }
}
@Lookup
@Lookup注解用于实现基于Lookup方式的方法注入。
- 定义两个prototype bean及其父类
@Component
@Scope("prototype")
public class Apple extends Fruit {

    public Apple() {
        System.out.println("Apple construct!");
    }
}

@Component
@Scope("prototype")
public class Banana extends Fruit {

    public Banana() {
        System.out.println("Banana construct!");
    }
}


public class Fruit {
    public Fruit() {
        System.out.println("Fruit construct!");
    }

}
- 定义抽象类,其中有一个需要注入具体实现方法的抽象方法。并通过
@Lookup注解注入具体方法实现
/**
 * 果盘
 */
@Component
public abstract class FruitPlate {

    /**
     * 每次从果盘中拿到的都是一个新的水果(实例)
     * @return
     */
    @Lookup("apple")	// 如果不传注解的参数,将按照匹配类型注入
    public abstract Fruit getFruit();
}
- 使用FruitPlate
public static void main(String[] args) throws SQLException {

        ConfigurableApplicationContext ctx = new AnnotationConfigApplicationContext(Application.class);

        FruitPlate applePlate = ctx.getBean(FruitPlate.class);
        applePlate.getFruit();
    }
使用JSR 330标准注解
从Spring3.0开始,我们除了可以使用spring提供的注解完成依赖注入外,还可以直接使用标准的JSR 330注解完成依赖注入。要使用它们需要添加如下依赖到工程中:
<dependency>
    <groupId>javax.inject</groupId>
    <artifactId>javax.inject</artifactId>
    <version>1</version>
</dependency>
@Inject、@Named
@Inject注解作用和Spring的@Autowired注解效果一致
@Named 注解有两个作用。 当用作方法的参数时和Spring的@Qualifier注解效果类似;而用作类上面的注解时作用和Spring的@Component注解类似
JSR 330标准注解与Spring注解对比
| Spring | javax.inject.* | javax.inject 限制 / 描述 |
|---|---|---|
| @Autowired | @Inject | @Inject没有required属性。 可以与Java 8的Optional一起使用。 |
| @Component | @Named / @ManagedBean | JSR-330 没有提供可组合的方式,Spring注解可以通过自由组合创建扩展自@Component的自定义的注解。 |
| @Scope("singleton") | @Singleton | JSR-330中只提供了一个@Singleton可用,虽然也提供了一个@Scope注解,但只是用于我们扩展自己的自定义注解,无法直接像Spring提供的@Scope一样直接应用。 |
| @Qualifier | @Qualifier / @Named | javax.inject.Qualifier 只是一个元注解(注解的注解)。 要想实现类似Spring中@Qualifier注解的功能,我们可以用 @Named注解 |
| @Value | - | |
| @Required | - | |
| @Lazy | - |